Pre-history
All this started way before I was even beginning to think about Kubernetes, how it works, what to do with it, or that I’m going to use it at home, somehow… I did hear about it, of course, just wasn’t anywhere close to actually use it, or even touch it.
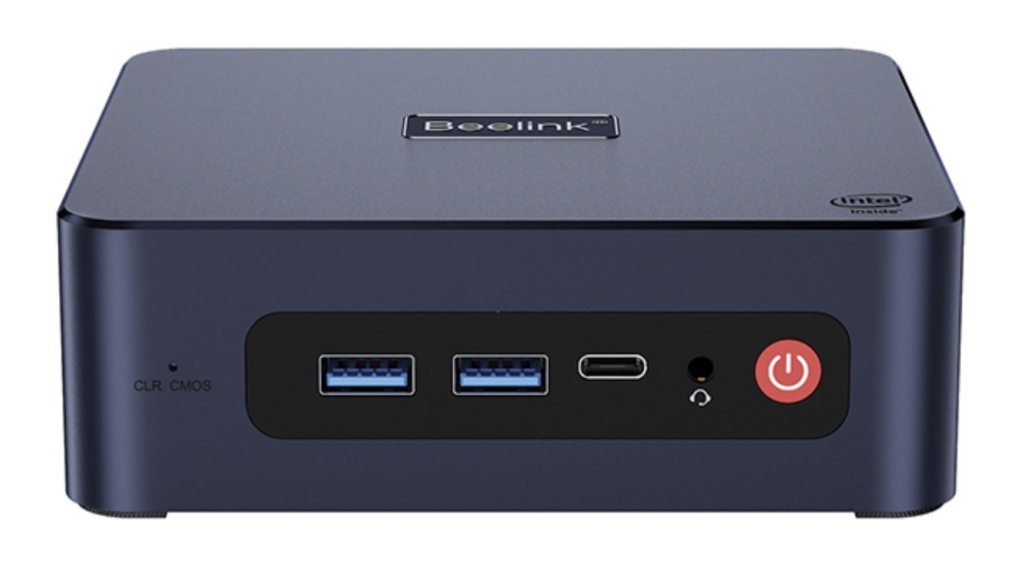
No, it was a day when I decided to upgrade my Raspberry Pi 2 B to something beefier. There was already a Raspberry Pi 4 released, but surprise surprise it was out of stock… everywhere… After a few months of waiting and searching and waiting, I decided to get myself a mini PC, one of those that fit in a pocket (not really), or can be mounted on the back of a monitor (more likely), or hold another piece of equipment like a 8-port switch (yes). This is the one: Beelink U59 Pro Mini PC.
Bought it, got it delivered, unpacked it – lovely little beast, quiet, very quiet. Opened it up and added an extra SSD for more storage. Booted it up – Windows 11, running smoothly, no adware, nothing. Saved the Windows product key. Shutdown and purged everything, installed Proxmox VE 7.x (now running latest 8.x). Just because I bought it for a lab, not an office terminal.
Between then and current state there were so many things happening with this little device that it would probably take a book to describe them. So many variations, updates, breaking issues and tests… This box saw so many Linux distributions, Virtual Machines, LXC containers, Docker containers… It was and still is a great test-bed for IaC using Ansible and Terraform though.
There is a Terraform provider for Proxmox (Telmate/proxmox), which does most of what’s needed, though sometimes need to do some tinkering after using Linux command line. But more on that later.
Actual setup
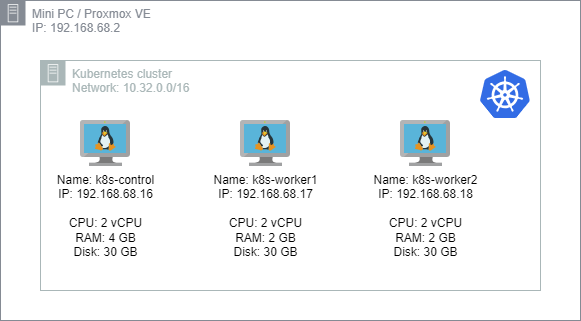
Right, back to the topic. So at the moment there is this little box sitting close to my router, doing all the testing things I need, running workloads. I have a git repo (which I haven’t yet released to public as it may hold some sensitive information, but I will!) that holds Terraform code required to setup and update the environment for the Home-lab Kubernetes cluster. All it does is creates 3 virtual machines on my Proxmox VE (mentioned above) and boots them up. Here’s a little diagram to show what it’s like:

Kubernetes cluster setup
To perform Kubernetes cluster setup (updates, pre-requisites, installation, setup, worker node join, etc) – I’ve created a piece of Ansible that does the job for me. It is all stored here on git: https://github.com/accesspc/home-lab-ansible
Once all 3 VMs are up and running (no updates, no nothing, just SSH service running and correct IP addresses), just follow next steps to run through the setup:
# Clone the repo into your directory of choice:
git clone [email protected]:accesspc/home-lab-ansible.git

# Update your ssh config as per README file on git:
vim ~/.ssh/config

# Change dir into repo:
cd home-lab-ansible

# Update inventory file to reflect your hostnames, IPs, users, versions, etc:
vim inventories/k8s.yml
Once all the preparation is done, just run through the Ansible command defined in README and you are all set with a new Kubernetes cluster. In a nutshell, this is what it achieves:
- common.all
- Installs some common required apt packages
- Runs apt update and upgrade
- Adds bash aliases and kubeadm, kubectl command completions to both your user and root
- k8s setup
- Performs modprobe, sysctl and swap modifications
- Installs containerd
- Installs kubeadm, kubectl and kubelet
- k8s init
- Initiates Kubernetes cluster with your defined version and network
- Copies config required for kubeadm and kubectl for root and your user
- Installs Calico as CNI plugin for Kubernetes
- k8s join
- Get a cluster join token and command from control plane and uses it to join the 2 worker nodes
Ready to serve
Once you run all the commands, you will have a running and ready to serve Kubernetes cluster with 1 Control Plane and 2 Worker nodes. To verify it’s all ok, ssh to you control plane node and run:
kubectl get nodesThe answer should be something like this:
$ kubectl get nodes
NAME          STATUS   ROLES           AGE   VERSION
k8s-control   Ready    control-plane   15d   v1.28.4
k8s-worker1   Ready    <none>          15d   v1.28.4
k8s-worker2   Ready    <none>          15d   v1.28.4
See, this wasn’t so hard! Now you can go and start running your services on Kubernetes. That is exactly what I did!
This is not the end! Stay tuned for further experiences.
P.S.
Some interesting things I’ve discovered while setting this all up. Initially I wanted to run all 3 nodes on LXC containers (they are as native to Proxmox as VMs are), and they are lighter, have less resource usage, but comes with some caveats, like nested virtualization, some hacking requires to forward /dev/dmsg from the Proxmox host on to the containers… After a few days spent trying and testing I’ve decided it may not be worth it and just carried on with VMs instead.
I may revisit this idea at some point in the future, but for now – it works like this and I’m happy about it!


